ASP.NET Core Identity
Welcome to Quickstart 5 for Duende IdentityServer! In this quickstart you will integrate IdentityServer with ASP.NET Core Identity.
IdentityServer’s flexible design allows you to use any database you want to store users and their data, including password hashes, multi-factor authentication details, roles, claims, profile data, etc. If you are starting with a new user database, then ASP.NET Core Identity is one option you could choose. This quickstart shows how to use ASP.NET Core Identity with IdentityServer.
The approach this quickstart takes to using ASP.NET Core Identity is to create a new project for the IdentityServer host. This new project will replace the IdentityServer project you built up in the previous quickstarts. You will create a new project because it is a convenient way to get the UI assets that are needed to login and logout with ASP.NET Core Identity. All the other projects in this solution (for the clients and the API) will remain the same.
In addition to the written steps below a YouTube video is available:
New Project For ASP.NET Core Identity
Section titled “New Project For ASP.NET Core Identity”The first step is to add a new project for ASP.NET Core Identity to your solution. We provide a template that contains the minimal UI assets needed to use ASP.NET Core Identity with IdentityServer. You will eventually delete the old project for IdentityServer, but there are some items that you will need to migrate over.
Start by creating a new IdentityServer project that will use ASP.NET Core
Identity. Run the following commands from the src directory:
dotnet new duende-is-aspid -n IdentityServerAspNetIdentitycd ..dotnet sln add ./src/IdentityServerAspNetIdentityWhen prompted to “seed” the user database, choose “Y” for “yes”. This populates the user database with our “alice” and “bob” users. Their passwords are “Pass123$”.
Inspect The New Project
Section titled “Inspect The New Project”Open the new project in the editor of your choice, and inspect the generated code. Much of it is the same from the prior quickstarts and templates. The following sections will describe some key differences and guide you through migrating configuration from the old IdentityServer Project, including:
- The project file (
IdentityServerAspNetIdentity.csproj) - Pipeline and service configuration (
HostingExtensions.cs) - Resource and client configuration (Config.cs)
- Entry point and seed data (
Program.csandSeedData.cs) - Login and logout pages (Pages in
Pages/Account)
IdentityServerAspNetIdentity.csproj
Section titled “IdentityServerAspNetIdentity.csproj”Notice the reference to Duende.IdentityServer.AspNetIdentity. This NuGet
package contains the ASP.NET Core Identity integration components for
IdentityServer.
HostingExtensions.cs
Section titled “HostingExtensions.cs”In ConfigureServices notice the necessary
AddDbContext<ApplicationDbContext>() and AddIdentity<ApplicationUser,
IdentityRole>() calls are done to configure ASP.NET Core Identity.
Also notice that much of the same IdentityServer configuration you did in the
previous quickstarts is already done. The template uses the in-memory style for
clients and resources, which are defined in Config.cs.
Finally, notice the addition of the new call to
AddAspNetIdentity<ApplicationUser>(). AddAspNetIdentity() adds the
integration layer to allow IdentityServer to access the user data for the
ASP.NET Core Identity user database. This is needed when IdentityServer must add
claims for the users into tokens.
Note that AddIdentity<ApplicationUser, IdentityRole>() must be invoked before
AddIdentityServer().
Config.cs
Section titled “Config.cs”Config.cs contains the hard-coded in-memory clients and resource definitions.
To keep the same clients and API working as the prior quickstarts, we need to
copy over the configuration data from the old IdentityServer project into this
one. Do that now, and afterwards Config.cs should look like this:
public static class Config{    public static IEnumerable<IdentityResource> IdentityResources =>        new IdentityResource[]        {            new IdentityResources.OpenId(),            new IdentityResources.Profile(),            new IdentityResource()            {                Name = "verification",                UserClaims = new List<string>                {                    JwtClaimTypes.Email,                    JwtClaimTypes.EmailVerified                }            }        };
    public static IEnumerable<ApiScope> ApiScopes =>        new ApiScope[]        {            new ApiScope(name: "api1", displayName: "My API")        };
    public static IEnumerable<Client> Clients =>        new Client[]        {            new Client            {                ClientId = "client",
                // no interactive user, use the clientid/secret for authentication                AllowedGrantTypes = GrantTypes.ClientCredentials,
                // secret for authentication                ClientSecrets =                {                    new Secret("secret".Sha256())                },
                // scopes that client has access to                AllowedScopes = { "api1" }            },            // interactive ASP.NET Core Web App            new Client            {                ClientId = "web",                ClientSecrets = { new Secret("secret".Sha256()) },
                AllowedGrantTypes = GrantTypes.Code,
                // where to redirect to after login                RedirectUris = { "https://localhost:5002/signin-oidc" },
                // where to redirect to after logout                PostLogoutRedirectUris = { "https://localhost:5002/signout-callback-oidc" },
                AllowOfflineAccess = true,
                AllowedScopes =                {                    IdentityServerConstants.StandardScopes.OpenId,                    IdentityServerConstants.StandardScopes.Profile,                    "verification",                    "api1"                }            }        };}
At this point, you no longer need the old IdentityServer project and can remove it from the solution. From the quickstart directory, run the following commands:
dotnet sln remove ./src/IdentityServerrm -r ./src/IdentityServerProgram.cs and SeedData.cs
Section titled “Program.cs and SeedData.cs”The application entry point in Program.cs is a little different than most
ASP.NET Core projects. Notice that it looks for a command line argument called
/seed which is used as a flag to seed the users in the ASP.NET Core Identity
database. This seed process is invoked during template creation and already ran
when you were prompted to seed the database.
Look at the SeedData class’ code to see how the database is created and the
first users are created.
Account Pages
Section titled “Account Pages”Finally, take a look at the pages in the
src/IdentityServerAspNetIdentity/Pages/Account directory. These pages contain
slightly different login and logout code than the prior quickstart and templates
because the login and logout processes now rely on ASP.NET Core Identity. Notice
the use of the SignInManager<ApplicationUser> and
UserManager<ApplicationUser> types from ASP.NET Core Identity to validate
credentials and manage the authentication session.
Much of the rest of the code is the same from the prior quickstarts and templates.
Logging In With The Web client
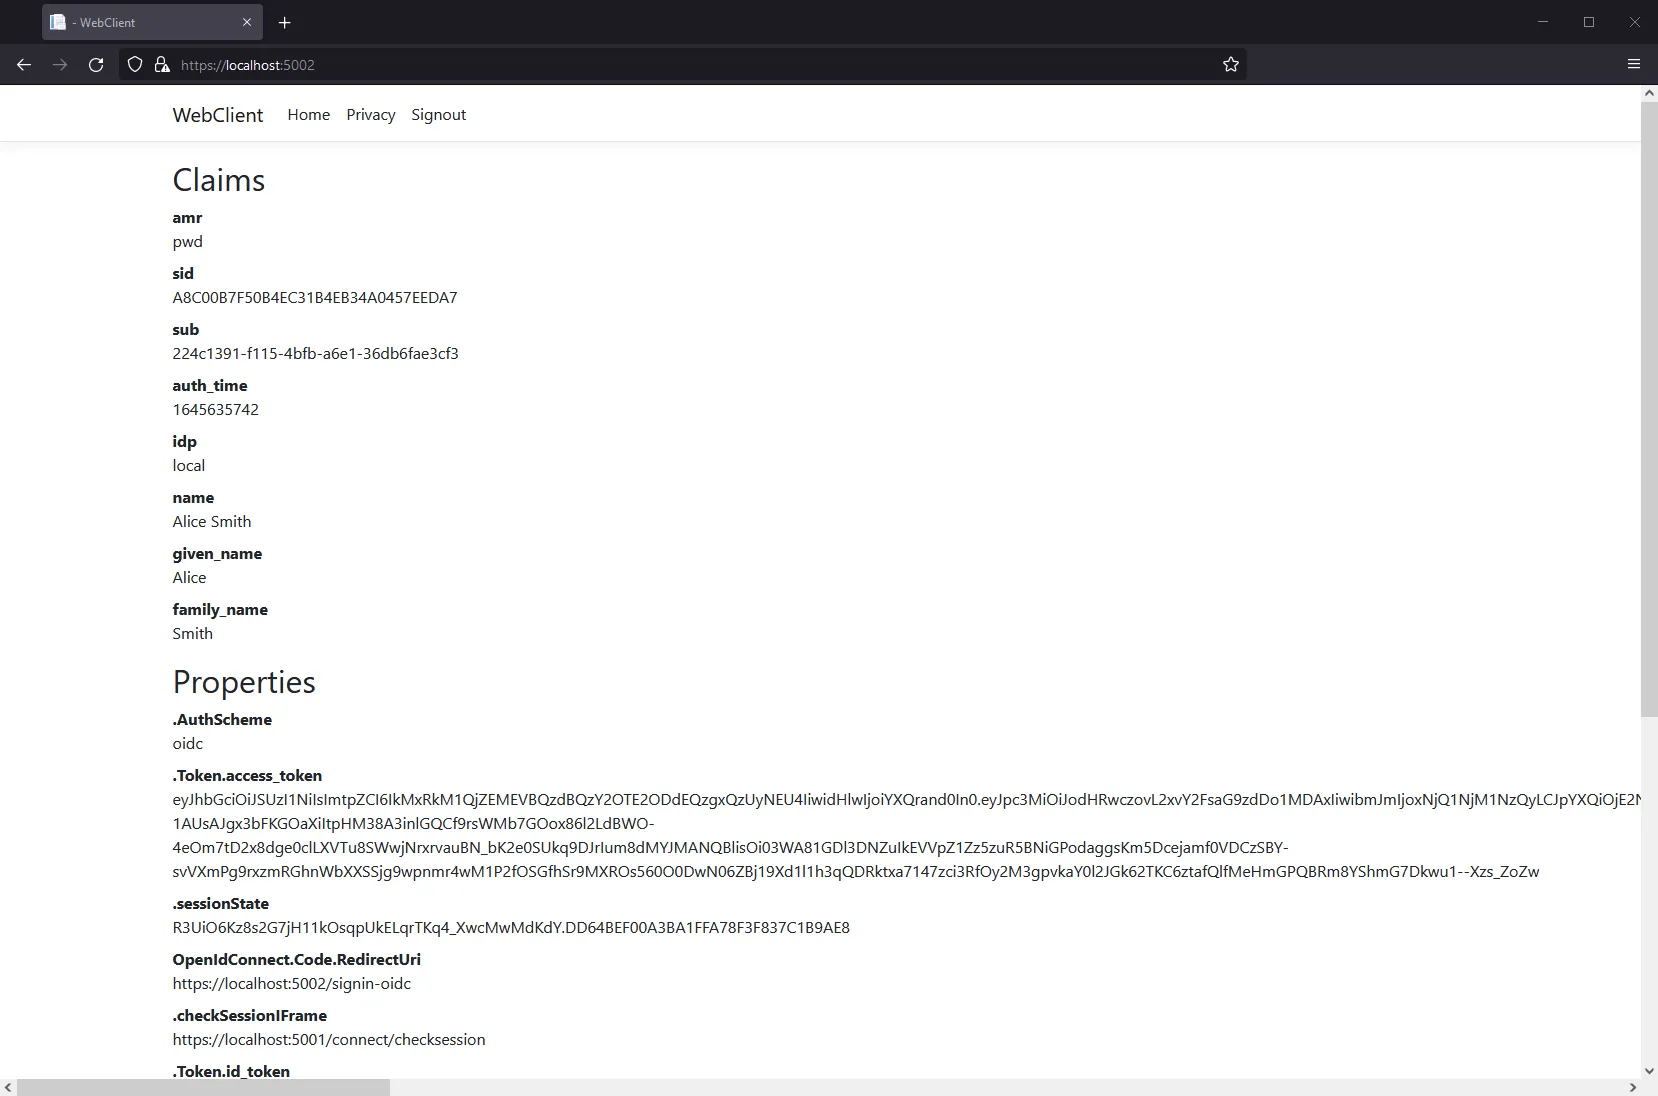
Section titled “Logging In With The Web client”At this point, you should be able to run all the existing clients and samples. Launch the Web client application, and you should be redirected to IdentityServer to log in. Login with one of the users created by the seed process (e.g., alice/Pass123$), and after that you will be redirected back to the Web client application where your user’s claims should be listed.
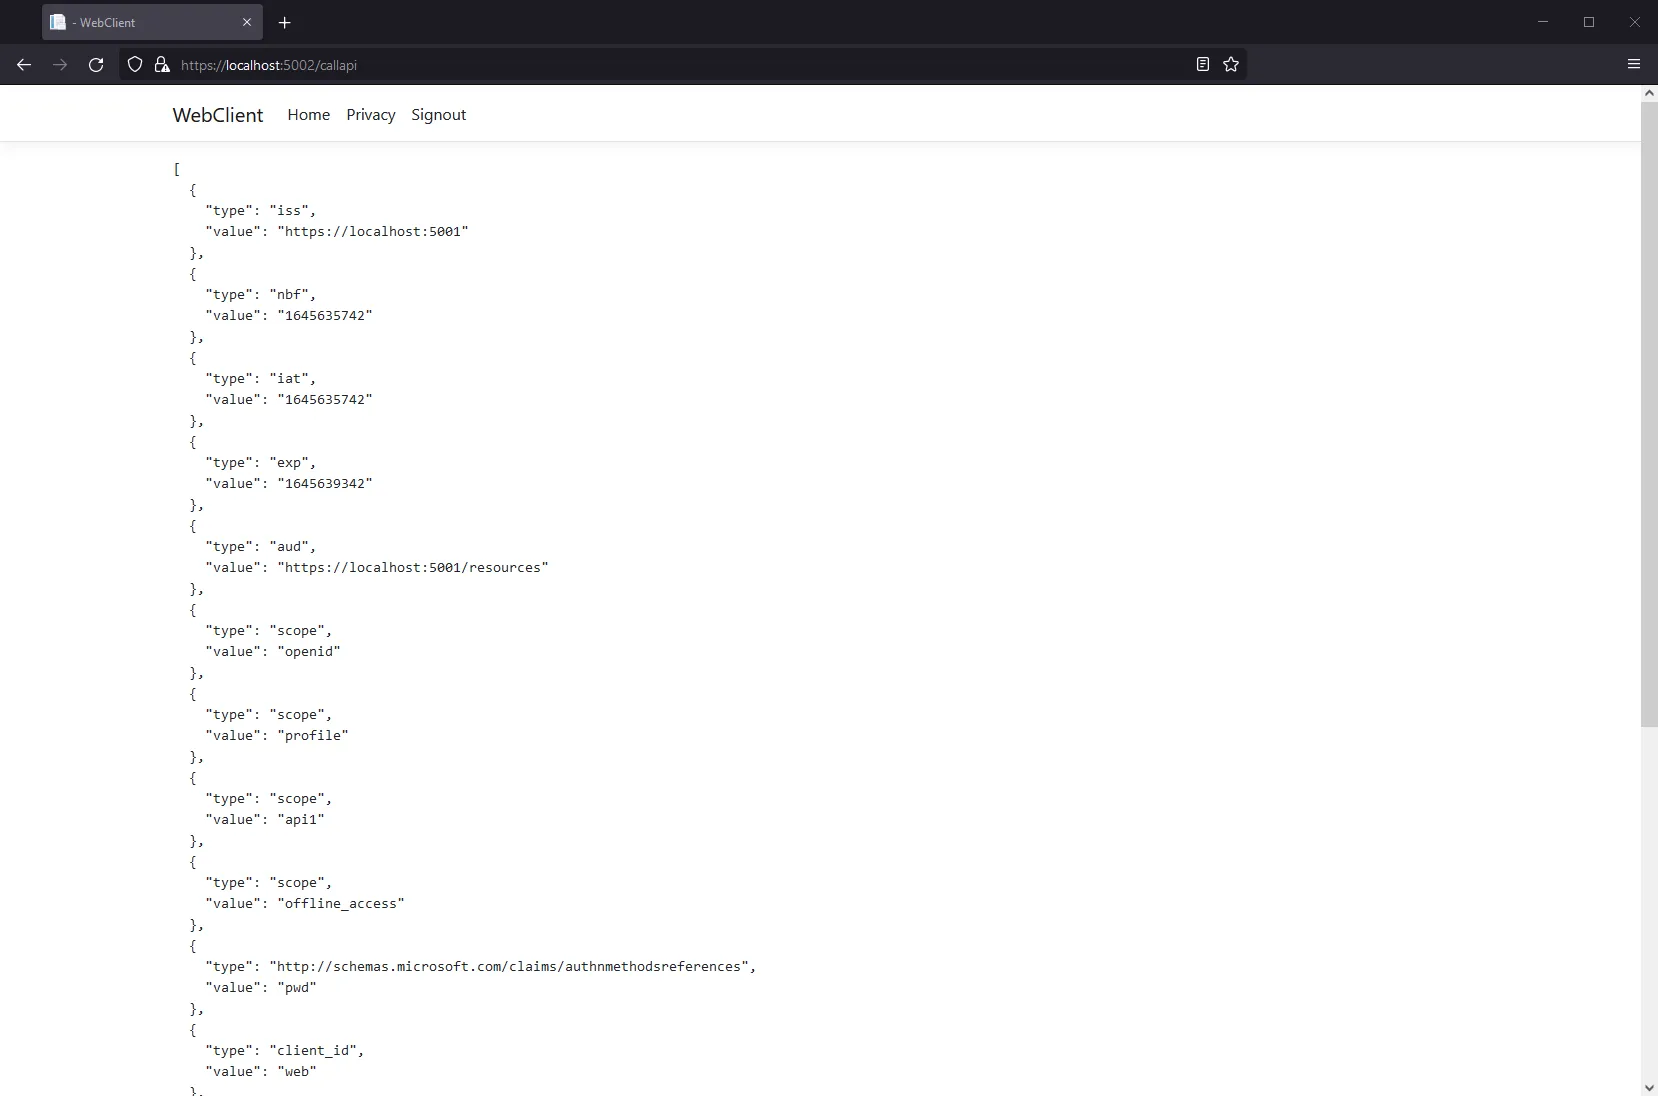
You should also be able to go to the call api page at https://localhost:5002/callapi to invoke the API on behalf of the user:
Congratulations, you’re using users from ASP.NET Core Identity in IdentityServer!
Adding Custom Profile Data
Section titled “Adding Custom Profile Data”Next you will add a custom property to your user model and include it as a claim when the appropriate Identity Resource is requested.
First, add a FavoriteColor property in
src/IdentityServerAspNetIdentity/ApplicationUser.cs.
public class ApplicationUser : IdentityUser{ public string FavoriteColor { get; set; }}Then, set the FavoriteColor of one of your test users in SeedData.cs
alice = new ApplicationUser{ UserName = "alice", Email = "AliceSmith@email.com", EmailConfirmed = true, FavoriteColor = "red",};In the same file, add code to recreate the database when you re-seed the data,
by calling EnsureDeleted just before Migrate:
var context = scope.ServiceProvider.GetService<ApplicationDbContext>();context.Database.EnsureDeleted();context.Database.Migrate();Next, create an ef migration for the CustomProfileData and reseed your user
database. Run the following commands from the src/IdentityServerAspNetIdentity
directory:
dotnet ef migrations add CustomProfileDatadotnet run /seedNow that you have more data in the database, you can use it to set claims.
IdentityServer contains an extensibility point called the IProfileService that
is responsible for retrieval of user claims. The ASP.NET Identity Integration
includes an implementation of IProfileService that retrieves claims from
ASP.NET Identity. You can extend that implementation to use the custom profile
data as a source of claims data. See here for more details on
the profile service.
Create a new file called src/IdentityServerAspNetIdentity/CustomProfileService.cs and add the
following code to it:
using Duende.IdentityServer.AspNetIdentity;using Duende.IdentityServer.Models;using IdentityServerAspNetIdentity.Models;using Microsoft.AspNetCore.Identity;using System.Security.Claims;
namespace IdentityServerAspNetIdentity{    public class CustomProfileService : ProfileService<ApplicationUser>    {        public CustomProfileService(UserManager<ApplicationUser> userManager, IUserClaimsPrincipalFactory<ApplicationUser> claimsFactory) : base(userManager, claimsFactory)        {        }
        protected override async Task GetProfileDataAsync(ProfileDataRequestContext context, ApplicationUser user)        {            var principal = await GetUserClaimsAsync(user);            var id = (ClaimsIdentity)principal.Identity;            if (!string.IsNullOrEmpty(user.FavoriteColor))            {                id.AddClaim(new Claim("favorite_color", user.FavoriteColor));            }
            context.AddRequestedClaims(principal.Claims);        }    }}
Register the CustomProfileService in HostingExtensions.cs:
builder.Services .AddIdentityServer(options => { // ... }) .AddInMemoryIdentityResources(Config.IdentityResources) .AddInMemoryApiScopes(Config.ApiScopes) .AddInMemoryClients(Config.Clients) .AddAspNetIdentity<ApplicationUser>() .AddProfileService<CustomProfileService>();Finally, you need to configure your application to make a request for the favorite_color, and include that claim in your client’s configuration.
Add a new IdentityResource in src/IdentityServerAspNetIdentity/Config.cs
that will map the color scope onto the favorite_color claim type:
public static IEnumerable<IdentityResource> IdentityResources => new IdentityResource[] { // ... new IdentityResource("color", new [] { "favorite_color" }) };Allow the web client to request the color scope (also in Config.cs):
new Client{    ClientId = "web",    // ...
    AllowedScopes = new List<string>    {        IdentityServerConstants.StandardScopes.OpenId,        IdentityServerConstants.StandardScopes.Profile,        "api1",        "color"    }}
Finally, update the WebClient project so that it will request the color scope.
In its src/WebClient/Program.cs file, add the color scope to the requested
scopes, and add a claim action to map the favorite_color into the principal:
.AddOpenIdConnect("oidc", options =>{    // ...
    options.Scope.Clear();    options.Scope.Add("openid");    options.Scope.Add("profile");    options.Scope.Add("offline_access");    options.Scope.Add("api1");    options.Scope.Add("color");
    options.GetClaimsFromUserInfoEndpoint = true;    options.ClaimActions.MapUniqueJsonKey("favorite_color", "favorite_color");});
Now restart the IdentityServerAspNetIdentity and WebClient projects, sign
out and sign back in as alice, and you should see the favorite color claim.
What’s Missing?
Section titled “What’s Missing?”The rest of the code in this template is similar to the other quickstarts and templates we provide. You will notice that this template does not include UI code for user registration, password reset, and other things you might expect from Microsoft’s templates that include ASP.NET Core Identity.
Given the variety of requirements and different approaches to using ASP.NET Core
Identity, our template deliberately does not provide those features. The intent
of this template is to be a starting point to which you can add the features you
need from ASP.NET Core Identity, customized according to your requirements.
Alternatively, you can create a new project based on the ASP.NET Core Identity
template
and add the IdentityServer features you have learned about in these quickstarts
to that project. With that approach, you may need to configure IdentityServer so
that it knows the paths to pages for user interactions. Set the LoginUrl,
LogoutUrl, ConsentUrl, ErrorUrl, and DeviceVerificationUrl as needed in your
IdentityServerOptions.