

Implementing Client-Initiated Backchannel Authentication (CIBA)
Duende IdentityServer supports the Client-Initiated Backchannel Authentication Flow (also known as CIBA). CIBA is one of the requirements to support the Financial-grade API compliance.
Normally when using OpenID Connect, a user accesses a client application on the same device they use to login to the OpenID Connect provider. For example, a user (via the browser) uses a web app (the client) and that same browser is redirected for the user to login at IdentityServer (the OpenID Connect provider), and this all takes place on the user’s device (e.g. their computer). Another example would be that a user uses a mobile app (the client), and it launches the browser for the user to login at IdentityServer (the OpenID Connect provider), and this all takes place on the user’s device (e.g. their mobile phone).
CIBA allows the user to interact with the client application on a different device than the one they use to log in. For example, the user can use a kiosk at the public library to access their data, but they perform the actual login on their mobile phone. Another example would be a user is at the bank and the bank teller wishes to access the user’s account, so the user logs into mobile phone to grant that access.
The user does not enter credentials on the device running the client application. Authentication happens on a separate, trusted device instead.
CIBA Workflow In IdentityServer
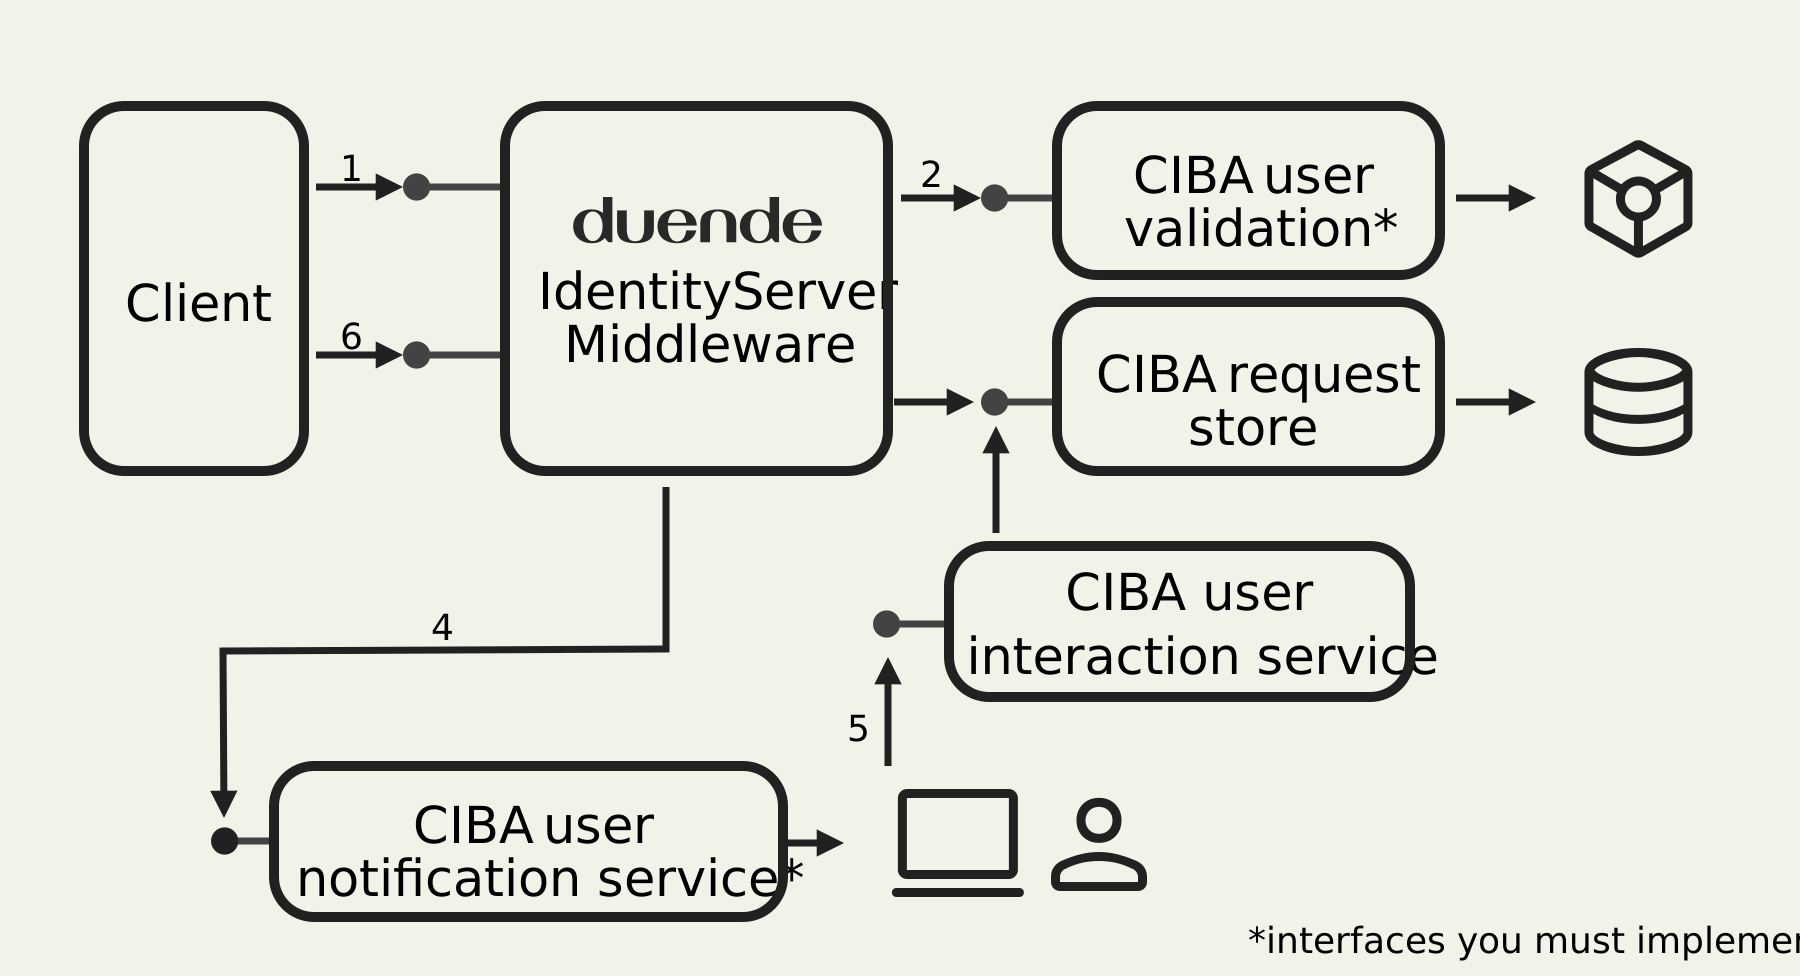
Section titled “CIBA Workflow In IdentityServer”Below is a diagram that shows the high level steps involved with the CIBA workflow and the supporting services involved.
-
Step 1: IdentityServer exposes a backchannel authentication request endpoint that the client uses to initiate the CIBA workflow.
-
Step 2: Once client authentication and basic request parameter validation is performed, the user for which the request is being made must be identified. This is done by using the IBackchannelAuthenticationUserValidator service in DI, which you are required to implement and register in the ASP.NET Core service provider. The
ValidateRequestAsyncmethod will validate the request parameters and return a result which will contain the user’ssub(subject identifier) claim. -
Step 3: Once a user has successfully been identified, then a record representing the pending login request is created in the Backchannel Authentication Request Store.
-
Step 4: Next, the user needs to be notified of the login request. This is done by using the IBackchannelAuthenticationUserNotificationService service in DI, which you are required to implement and register in the ASP.NET Core service provider. The
SendLoginRequestAsyncmethod should contact the user with whatever mechanism is appropriate (e.g. email, text message, push notification, etc.), and presumably provide the user with instructions (perhaps via a link, but other approaches are conceivable) to start the login and consent process. This method is passed a BackchannelUserLoginRequest which will contain all the contextual information needed to send to the user (theInternalIdbeing the identifier for this login request which is needed when completing the request — see below). -
Step 5: Next, the user should be presented with the information for the login request (e.g. via a web page at IdentityServer, or via any other means appropriate). The IBackchannelAuthenticationInteractionService can be used to access an indivdual BackchannelUserLoginRequest by its
InternalId. Once the user has consented and allows the login, then theCompleteLoginRequestAsyncmethod should be used to record the result (including which scopes the user has granted). -
Step 6: Finally, the client, after polling for the result, will finally be issued the tokens it’s requested (or a suitable error if the user has denied the request, or it has timed out).
How To Configure A CIBA Client
Section titled “How To Configure A CIBA Client”This configuration runs in the IdentityServer host. Add GrantTypes.Ciba to the client and allow only the scopes the
client needs:
// Config.cs in the IdentityServer hostnew Client{ ClientId = "ciba-client", ClientSecrets = { new Secret("secret".Sha256()) }, AllowedGrantTypes = GrantTypes.Ciba, RequireConsent = true, AllowedScopes = { "openid", "profile", "orders.write" }};The client authenticates at the backchannel authentication endpoint, receives an auth_req_id, and polls the token
endpoint until the user approves or denies the request. It must follow the polling interval returned by IdentityServer
and handle authorization_pending, slow_down, expiration, and denial responses.
How To Notify The User
Section titled “How To Notify The User”Notifications are an application responsibility. In the IdentityServer host, implement
IBackchannelAuthenticationUserNotificationService
to send a push notification, SMS, email, or another out-of-band message after IdentityServer creates a pending request.
// UserNotificationService.cs in the IdentityServer hostpublic class UserNotificationService : IBackchannelAuthenticationUserNotificationService{ public Task SendLoginRequestAsync( BackchannelUserLoginRequest request, CancellationToken cancellationToken) { return SendNotificationAsync( subjectId: request.Subject.GetSubjectId(), requestId: request.InternalId, bindingMessage: request.BindingMessage, cancellationToken: cancellationToken); }}Register the implementation in the IdentityServer host:
// Program.cs in the IdentityServer hostbuilder.Services.AddIdentityServer() .AddBackchannelAuthenticationUserNotificationService<UserNotificationService>();The built-in no-op implementation logs a URL for testing. Replace it in production. Do not put credentials, tokens, or
personal data in the notification. Treat InternalId as sensitive and use a short-lived HTTPS link when you include it.
The user should see the BindingMessage on both devices and confirm that the values match before approving the request.
Use a value with enough entropy or transaction context to make that comparison meaningful; a generic message such as
“Confirm login” does not help the user detect a mismatched request.
How To Display Pending CIBA Requests
Section titled “How To Display Pending CIBA Requests”This code runs in an authenticated page in the IdentityServer host. Use
IBackchannelAuthenticationInteractionService to retrieve requests for the currently signed-in user:
// PendingRequests.cshtml.cs in the IdentityServer hostpublic async Task OnGetAsync(){ Requests = await _interaction.GetPendingLoginRequestsForCurrentUserAsync( HttpContext.RequestAborted);}Show the requesting client’s name, requested scopes, and binding message before asking the user to approve or deny the
request. Do not load a request by InternalId and display it without also checking that its subject matches the signed-in
user.
How To Complete A CIBA Request
Section titled “How To Complete A CIBA Request”This code runs in the approval POST handler in the IdentityServer host. Reload the request, verify that it belongs to the signed-in user, and pass only scopes the user approved from the original request:
// Consent.cshtml.cs in the IdentityServer hostvar request = await _interaction.GetLoginRequestByInternalIdAsync(    Input.Id,    HttpContext.RequestAborted);
if (request is null || request.Subject.GetSubjectId() != User.GetSubjectId()){    _logger.LogWarning("CIBA request {RequestId} does not belong to the current user", Input.Id);    return BadRequest();}
var completion = new CompleteBackchannelLoginRequest(Input.Id){    ScopesValuesConsented = Input.ScopesConsented};
await _interaction.CompleteLoginRequestAsync(    completion,    HttpContext.RequestAborted);
Leave ScopesValuesConsented empty to deny the request. IdentityServer also rejects scopes that were not part of the
original CIBA request. Protect the approval POST with antiforgery validation and require the user to make an explicit
choice for each request.
Raise ConsentGrantedEvent or ConsentDeniedEvent from the approval page so the decision is included in your
IdentityServer audit events.