Interactive Applications With ASP.NET Core
Welcome to Quickstart 2 for Duende IdentityServer!
In this quickstart, you will add support for interactive user authentication via the OpenID Connect protocol to the IdentityServer you built in Quickstart 1. Once that is in place, you will create an ASP.NET Razor Pages application that will use IdentityServer for authentication.
In addition to the written steps below there’s also a YouTube video available:
Enable OIDC In IdentityServer
Section titled “Enable OIDC In IdentityServer”To enable OIDC in IdentityServer you need:
- An interactive UI
- Configuration for OIDC scopes
- Configuration for an OIDC client
- Users to log in with
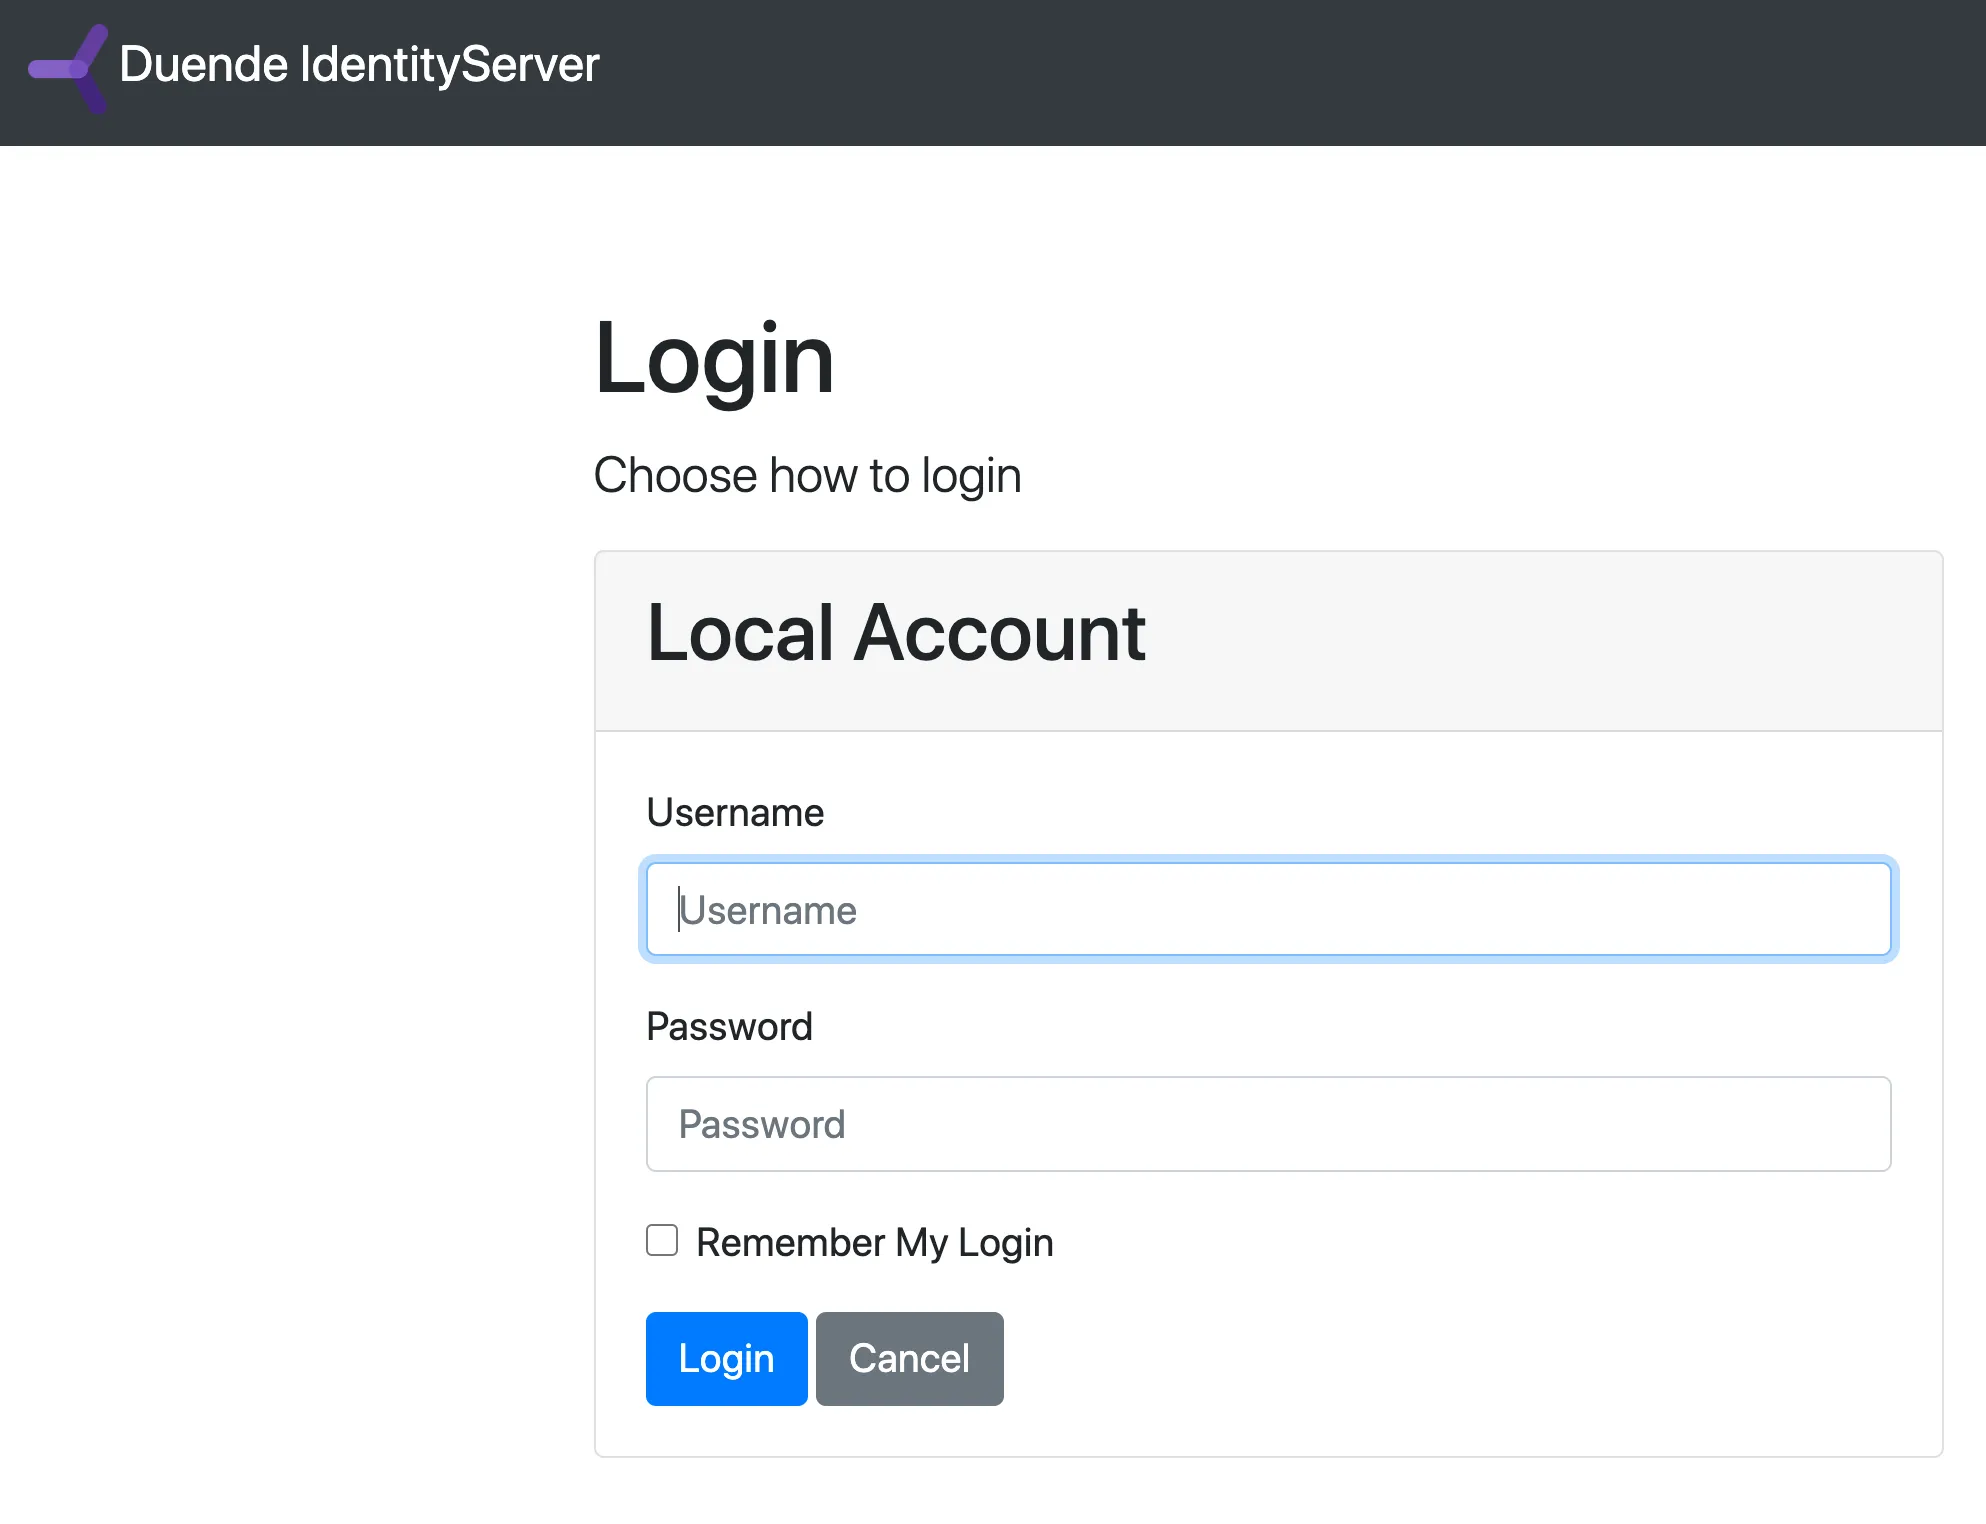
Add The UI
Section titled “Add The UI”Support for the OpenID Connect protocol is already built into IdentityServer. You need to provide the User Interface for login, logout, consent, and error.
While the look & feel and workflows will differ in each implementation, we
provide a Razor Pages-based UI that you can use as a starting point. You can use
the .NET CLI to add the quickstart UI to a project. Run the following command
from the src/IdentityServer directory:
dotnet new duende-is-uiEnable The UI
Section titled “Enable The UI”Once you have added the UI, you will need to register its services and enable it
in the pipeline. In src/IdentityServer/HostingExtensions.cs you will find
commented out code in the ConfigureServices and ConfigurePipeline methods
that enable the UI. Note that there are three places to comment in - two in
ConfigurePipeline and one in ConfigureServices.
Comment in the service registration and pipeline configuration, run the
IdentityServer project, and navigate to https://localhost:5001. You should now
see a home page.
Spend some time reading the pages and models, especially those in the
src/IdentityServer/Pages/Account directory. These pages are the main UI entry
points for login and logout. The better you understand them, the easier it will
be to make future modifications.
Configure OIDC Scopes
Section titled “Configure OIDC Scopes”Similar to OAuth, OpenID Connect uses scopes to represent something you want to protect and that clients want to access. In contrast to OAuth, scopes in OIDC represent identity data like user id, name or email address rather than APIs.
Add support for the standard openid (subject id) and profile (first name,
last name, etc.) scopes by declaring them in src/IdentityServer/Config.cs:
public static IEnumerable<IdentityResource> IdentityResources => new IdentityResource[] { new IdentityResources.OpenId(), new IdentityResources.Profile(), };Then register the identity resources in
src/IdentityServer/HostingExtensions.cs:
builder.Services.AddIdentityServer() .AddInMemoryIdentityResources(Config.IdentityResources) .AddInMemoryApiScopes(Config.ApiScopes) .AddInMemoryClients(Config.Clients);Add Test Users
Section titled “Add Test Users”The sample UI also comes with an in-memory “user database”. You can enable this
by calling AddTestUsers in src/IdentityServer/HostingExtensions.cs:
builder.Services.AddIdentityServer() .AddInMemoryIdentityResources(Config.IdentityResources) .AddInMemoryApiScopes(Config.ApiScopes) .AddInMemoryClients(Config.Clients) .AddTestUsers(TestUsers.Users);In the TestUsers class, you can see that two users called alice and bob
are defined with some identity claims. You can use those users to login. Note
that the test users’ passwords match their usernames.
Register An OIDC client
Section titled “Register An OIDC client”The last step in the IdentityServer project is to add a new configuration
entry for a client that will use OIDC to log in. You will create the application
code for this client in the next section. For now, you will register
its configuration.
OpenID Connect-based clients are very similar to the OAuth clients we added in Quickstart 1. But since the flows in OIDC are always interactive, we need to add some redirect URLs to our configuration.
The Clients list in src/IdentityServer/Config.cs should look like this:
public static IEnumerable<Client> Clients =>    new List<Client>    {        // machine to machine client (from quickstart 1)        new Client        {            ClientId = "client",            ClientSecrets = { new Secret("secret".Sha256()) },
            AllowedGrantTypes = GrantTypes.ClientCredentials,            // scopes that client has access to            AllowedScopes = { "api1" }        },        // interactive ASP.NET Core Web App        new Client        {            ClientId = "web",            ClientSecrets = { new Secret("secret".Sha256()) },
            AllowedGrantTypes = GrantTypes.Code,
            // where to redirect to after login            RedirectUris = { "https://localhost:5002/signin-oidc" },
            // where to redirect to after logout            PostLogoutRedirectUris = { "https://localhost:5002/signout-callback-oidc" },
            AllowedScopes =            {                IdentityServerConstants.StandardScopes.OpenId,                IdentityServerConstants.StandardScopes.Profile            }        }    };
Create The OIDC client
Section titled “Create The OIDC client”Next you will create an ASP.NET web application that will allow interactive
users to log in using OIDC. Use the webapp template to create the project. Run
the following commands from the src directory:
dotnet new webapp -n WebClientcd ..dotnet sln add ./src/WebClientInstall The OIDC NuGet Package
Section titled “Install The OIDC NuGet Package”To add support for OpenID Connect authentication to the WebClient project, you
need to add the NuGet package containing the OpenID Connect handler. From the
src/WebClient directory, run the following command:
dotnet add package Microsoft.AspNetCore.Authentication.OpenIdConnectConfigure Authentication Services
Section titled “Configure Authentication Services”Then add the authentication service and register the cookie and OpenIdConnect authentication providers in
src/WebClient/Program.cs:
builder.Services.AddAuthentication(options =>    {        options.DefaultScheme = "Cookies";        options.DefaultChallengeScheme = "oidc";    })    .AddCookie("Cookies")    .AddOpenIdConnect("oidc", options =>    {        options.Authority = "https://localhost:5001";
        options.ClientId = "web";        options.ClientSecret = "secret";        options.ResponseType = "code";
        options.Scope.Clear();        options.Scope.Add("openid");        options.Scope.Add("profile");
        options.MapInboundClaims = false; // Don't rename claim types
options.SaveTokens = true; });AddAuthentication registers the authentication services. Notice that in its
options, the DefaultChallengeScheme is set to “oidc”, and the DefaultScheme is
set to “Cookies”. The DefaultChallengeScheme is used when an unauthenticated
user must log in. This begins the OpenID Connect protocol, redirecting the user
to IdentityServer. After the user has logged in and been redirected back to
the client, the client creates its own local cookie. Subsequent requests to the
client will include this cookie and be authenticated with the default Cookie
scheme.
After the call to AddAuthentication, AddCookie adds the handler that can
process the local cookie.
Finally, AddOpenIdConnect is used to configure the handler that performs the
OpenID Connect protocol. The Authority indicates where the trusted token
service is located. The ClientId and the ClientSecret identify this client.
The Scope is the collection of scopes that the client will request. By default,
it includes the openid and profile scopes, but clear the collection and add them
back for explicit clarity. SaveTokens is used to persist the tokens in the
cookie (as they will be needed later).
Configure The Pipeline
Section titled “Configure The Pipeline”Now add UseAuthentication to the ASP.NET pipeline in
src/WebClient/Program.cs. Also chain a call to RequireAuthorization onto
MapRazorPages to disable anonymous access for the entire application.
app.UseRouting();app.UseAuthentication();app.UseAuthorization();
app.MapRazorPages().RequireAuthorization();Display The Auth Cookie
Section titled “Display The Auth Cookie”Modify src/WebClient/Pages/Index.cshtml to display the claims of the user and
the cookie properties:
@page@model IndexModel
@using Microsoft.AspNetCore.Authentication
<h2>Claims</h2>
<dl>    @foreach (var claim in User.Claims)    {        <dt>@claim.Type</dt>        <dd>@claim.Value</dd>    }</dl>
<h2>Properties</h2>
<dl>    @foreach (var prop in (await HttpContext.AuthenticateAsync()).Properties!.Items)    {        <dt>@prop.Key</dt>        <dd>@prop.Value</dd>    }</dl>
Configure WebClient’s Port
Section titled “Configure WebClient’s Port”Update the client’s applicationUrl in
src/WebClient/Properties/launchSettings.json to use port 5002.
{ "$schema": "https://json.schemastore.org/launchsettings.json", "profiles": { "WebClient": { "commandName": "Project", "dotnetRunMessages": true, "launchBrowser": true, "applicationUrl": "https://localhost:5002", "environmentVariables": { "ASPNETCORE_ENVIRONMENT": "Development" } } }}Test The client
Section titled “Test The client”Now everything should be in place to log in to WebClient using OIDC. Run
IdentityServer and WebClient and then trigger the authentication handshake
by navigating to the protected home page. You should see a redirect to the login
page in IdentityServer.
After you log in, IdentityServer will redirect back to WebClient, where the
OpenID Connect authentication handler will process the response and sign-in the
user locally by setting a cookie. Finally, the WebClient’s page will show the
contents of the cookie.
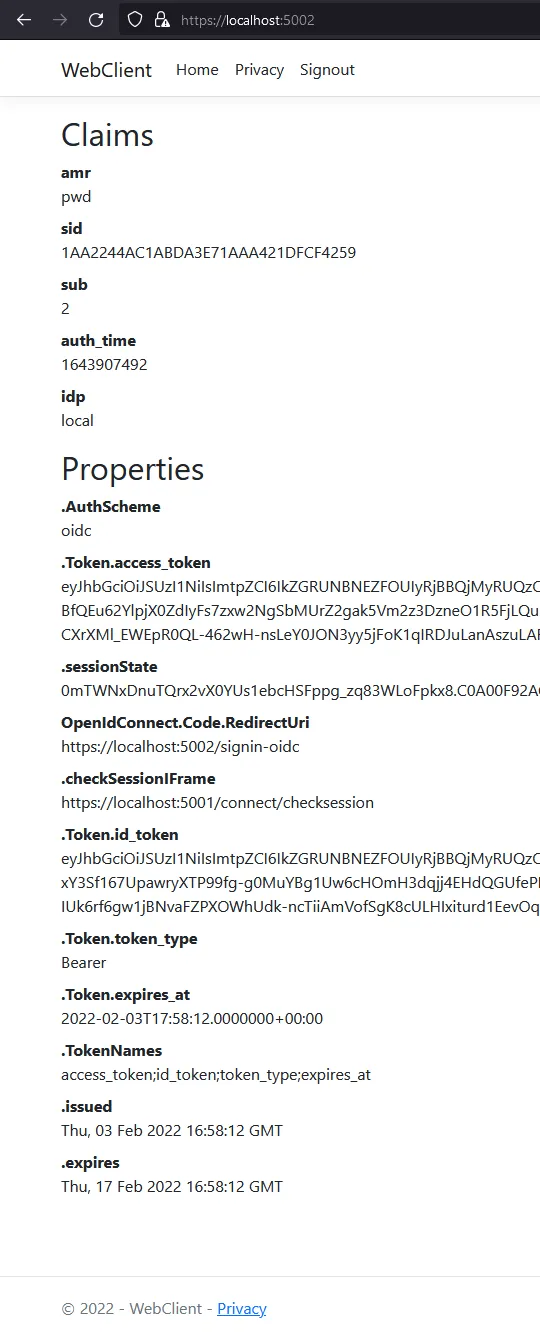
As you can see, the cookie has two parts: the claims of the user and some
metadata in the properties. This metadata also contains the original
access and id tokens issued by IdentityServer. Feel free to copy these tokens
to jwt.me to inspect their contents.
Adding Sign-out
Section titled “Adding Sign-out”Next you will add sign-out to WebClient.
To sign out, you need to
- Clear local application cookies
- Make a roundtrip to
IdentityServerusing the OIDC protocol to clear its session
The cookie auth handler will clear the local cookie when you sign out from its
authentication scheme. The OpenId Connect handler will perform the protocol
steps for the roundtrip to IdentityServer when you sign out of its scheme.
Create a page to trigger sign-out of both schemes by running the following
command from the src/WebClient/Pages directory:
dotnet new page -n SignoutUpdate the new page’s model (src/WebClient/Pages/Signout.cshtml.cs) with the
following code:
public class SignoutModel : PageModel{ public IActionResult OnGet() { return SignOut("Cookies", "oidc"); }}This will clear the local cookie and then redirect to the IdentityServer. The IdentityServer will clear its cookies and then give the user a link to return back to the web application.
Create a link to the logout page in src/WebClient/Pages/Shared/_Layout.cshtml
within the navbar-nav list:
<!-- Existing navbar generated by template --><ul class="navbar-nav flex-grow-1">    <li class="nav-item">        <a class="nav-link text-dark" asp-area="" asp-page="/Index">Home</a>    </li>    <li class="nav-item">        <a class="nav-link text-dark" asp-area="" asp-page="/Privacy">Privacy</a>    </li>
    <!-- Add this item to the list -->    <li class="nav-item">        <a class="nav-link text-dark" asp-area="" asp-page="/Signout">Signout</a>    </li></ul>
Run the application again, and try logging out. Observe that you get redirected to the end session endpoint, and that both session cookies are cleared.
Getting Claims From The UserInfo Endpoint
Section titled “Getting Claims From The UserInfo Endpoint”You might have noticed that even though you’ve configured the client to be
allowed to retrieve the profile identity scope, the claims associated with
that scope (such as name, given_name, family_name, etc.) don’t appear in the
returned token. You need to tell the client to retrieve those claims from the
userinfo endpoint by specifying scopes that the client application needs to
access and setting the GetClaimsFromUserInfoEndpoint option. Add the following
to ConfigureServices in src/WebClient/Program.cs:
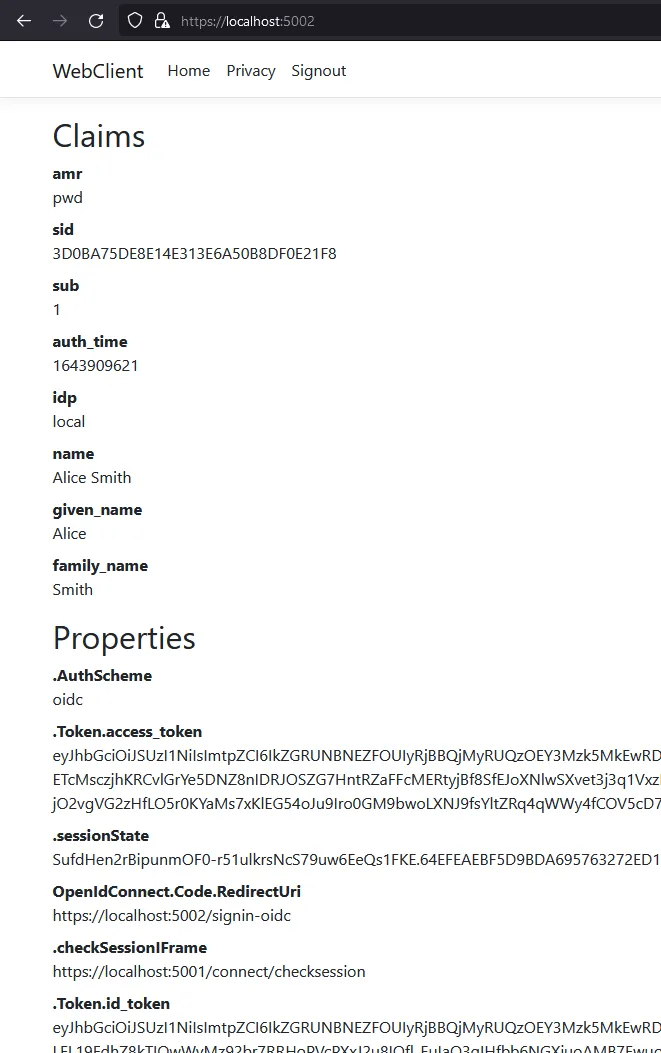
.AddOpenIdConnect("oidc", options =>{ // ... options.Scope.Clear(); options.Scope.Add("openid"); options.Scope.Add("profile"); options.GetClaimsFromUserInfoEndpoint = true; // ...});After restarting the client app and logging back in, you should see additional user claims
associated with the profile identity scope displayed on the page.
Further Experiments
Section titled “Further Experiments”This quickstart created a client with interactive login using OIDC. To experiment further you can
- Add additional claims to the identity
- Add support for external authentication
Add More Claims
Section titled “Add More Claims”To add more claims to the identity:
-
Add a new identity resource to the list in
src/IdentityServer/Config.cs. Name it and specify which claims should be returned when it is requested. TheNameproperty of the resource is the scope value that clients can request to get the associatedUserClaims. For example, you could add anIdentityResourcenamed “verification” which would include theemailandemail_verifiedclaims.public static IEnumerable<IdentityResource> IdentityResources =>new List<IdentityResource>{new IdentityResources.OpenId(),new IdentityResources.Profile(),new IdentityResource(){Name = "verification",UserClaims = new List<string>{JwtClaimTypes.Email,JwtClaimTypes.EmailVerified}}}; -
Give the client access to the resource via the
AllowedScopesproperty on the client configuration insrc/IdentityServer/Config.cs. The string value inAllowedScopesmust match theNameproperty of the resource.new Client{ClientId = "web",//...AllowedScopes ={IdentityServerConstants.StandardScopes.OpenId,IdentityServerConstants.StandardScopes.Profile,"verification"}} -
Request the resource by adding it to the
Scopescollection on the OpenID Connect handler configuration insrc/WebClient/Program.cs, and add a ClaimAction to map the new claim returned from the userinfo endpoint onto a user claim.Program.cs .AddOpenIdConnect("oidc", options =>{// ...options.Scope.Add("verification");options.ClaimActions.MapJsonKey("email_verified", "email_verified");// ...}
IdentityServer uses the IProfileService to retrieve claims for tokens and the
userinfo endpoint. You can provide your own implementation of IProfileService
to customize this process with custom logic, data access, etc. Since you are
using AddTestUsers, the TestUserProfileService is used automatically. It
will automatically include requested claims from the test users added in
src/IdentityServer/TestUsers.cs.
Add Support for External Authentication
Section titled “Add Support for External Authentication”Adding support for external authentication to your IdentityServer can be done with very little code; all that is needed is an authentication handler.
ASP.NET Core ships with handlers for OpenID Connect, and provides integrations for Google, Facebook, Microsoft Account, Entra ID, and more.
In this section, you’ll register the Duende IdentityServer demo instance at demo.duendesoftware.com as an external provider.
Since no other configuration is required apart from your IdentityServer, it is a good starting point.
You’ll also see how to add Google authentication support.
Adding An Additional OpenID Connect-Based External Provider
Section titled “Adding An Additional OpenID Connect-Based External Provider”A cloud-hosted demo instance of Duende IdentityServer can be added as an additional external provider.
Register and configure the services for the OpenId Connect handler insrc/IdentityServer/HostingExtensions.cs:
builder.Services.AddAuthentication() .AddOpenIdConnect("oidc", "Sign-in with demo.duendesoftware.com", options => { options.SignInScheme = IdentityServerConstants.ExternalCookieAuthenticationScheme; options.SignOutScheme = IdentityServerConstants.SignoutScheme; options.SaveTokens = true;
options.Authority = "https://demo.duendesoftware.com"; options.ClientId = "interactive.confidential"; options.ClientSecret = "secret"; options.ResponseType = "code";
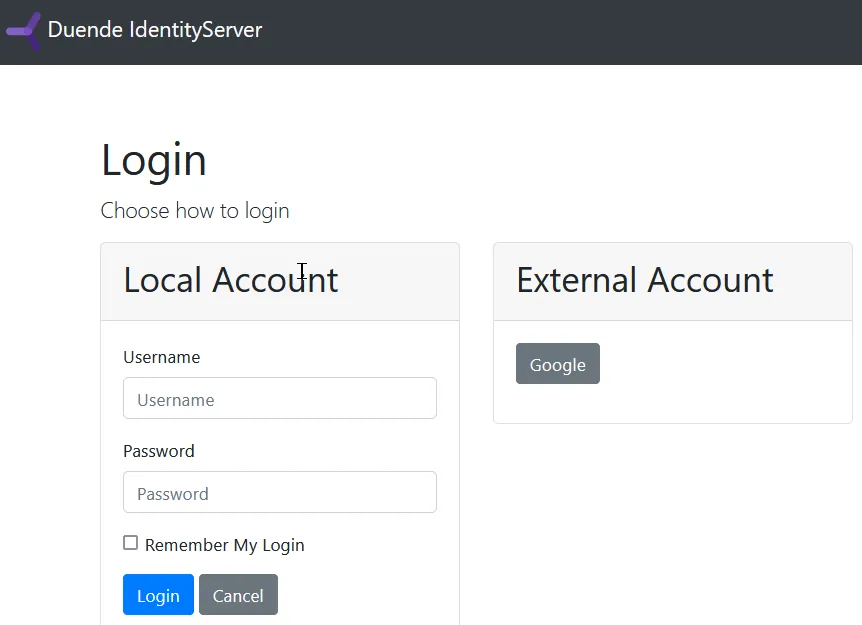
options.TokenValidationParameters = new TokenValidationParameters { NameClaimType = "name", RoleClaimType = "role" }; });Now if you try to authenticate, you should see an additional Sign-in with demo.duendesoftware.com button to log in to the cloud-hosted demo IdentityServer. If you click that button, you will be redirected to https://demo.duendesoftware.com/.
Check that the page’s location has changed and then log in using the alice or bob users (their passwords are their usernames, just as
they are for the local test users). You should land back at WebClient, authenticated with a demo user.
The demo users are logically distinct entities from the local test users, even though they happen to have identical usernames.
Inspect their claims in WebClient and note the differences between them, such as the distinct sub claims.
Add Google Support
Section titled “Add Google Support”To use Google for authentication, you need to:
- Add the
Google.Apis.Auth.AspNetCore3NuGet package to the IdentityServer project. - Register with Google and set up a client.
- Store the client id and secret securely with
dotnet user-secrets. - Add the Google authentication handler to the middleware pipeline and configure it.
See Microsoft’s guide for details on how to register with Google, create the client, and store the secrets in user secrets. Stop before adding the authentication middleware and Google authentication handler to the pipeline. You will need an IdentityServer specific option.
Add the following to ConfigureServices in src/IdentityServer/HostingExtensions.cs:
builder.Services.AddAuthentication()    .AddGoogleOpenIdConnect(        authenticationScheme: GoogleOpenIdConnectDefaults.AuthenticationScheme,        displayName: "Google",        configureOptions: options =>        {            options.SignInScheme = IdentityServerConstants.ExternalCookieAuthenticationScheme;
options.ClientId = builder.Configuration["Authentication:Google:ClientId"]; options.ClientSecret = builder.Configuration["Authentication:Google:ClientSecret"]; });When authenticating with Google, there are again two authentication schemes.
AddGoogleOpenIdConnect adds the GoogleOpenIdConnect scheme, which handles the protocol flow back and forth with Google.
After successful login, the application needs to sign in to an additional scheme that can authenticate future requests without
needing a roundtrip to Google - typically by issuing a local cookie. The SignInScheme tells the Google handler to use
the scheme named IdentityServerConstants.ExternalCookieAuthenticationScheme, which is a cookie authentication handler
automatically created by IdentityServer that is intended for external logins.
Now run IdentityServer and WebClient and try to authenticate (you may need to log out and log back in)
You will see a Google button on the login page.
Click on Google and authenticate with a Google account. You should land back on
the WebClient home page, showing that the user is now coming from Google with
claims sourced from Google’s data.